Inspired by the viral hit of Dubai chocolate - this Chocolate Pistachio Tart is the perfect dessert centerpiece for any occasion! Decadent and delicious, this tart is loaded with a fudgy dark chocolate base and pistachio kataifi filling.

Jump to:
- Why you'll love this tart
- Equipment Notes
- Ingredient Notes for the Crust
- Ingredient Notes for the Fudgy Chocolate Layer
- Ingredient Notes for the Pistachio Kataifi Filling
- Ingredient Notes for the Ganache Topping
- How to Make Dubai Chocolate Tart - Part 1 (Crust and Chocolate Layer)
- How to Make Dubai Chocolate Tart - Part 2 (Pistachio Kataifi Filling and Topping)
- Expert Tips
- Storage Advice
- Substitutes and Alternatives
- FAQs
- More Pistachio Recipes
- Dubai Chocolate Pistachio Tart
Why you'll love this tart
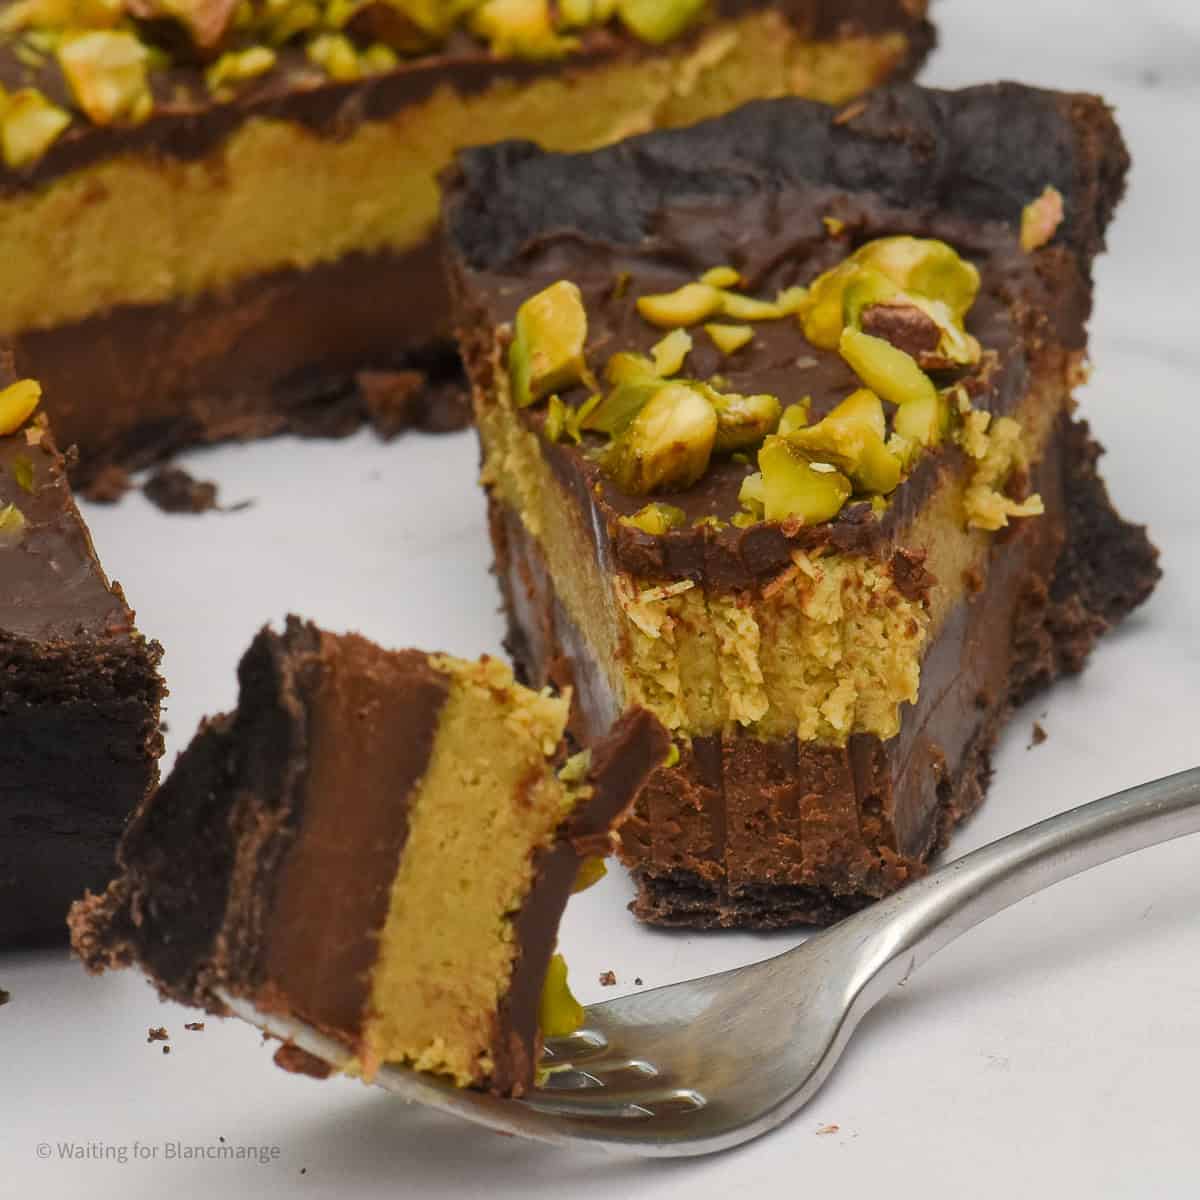
This recipe is divided into four key parts: the crust, the chocolate base, the pistachio filling and ganache topping. Each layer giving you more reason to love it!
- Easy layered tart - if you're looking for something new and unique for your holiday table or an easy bake ahead dessert, this pistachio and chocolate tart will be an absolutely delicious addition to your repertoire and sure to impress guests.
- Decadent chocolate base - the bottom layer here is a rich and fudgy chocolate filling, similar to my Baileys Chocolate Tart, but minus the Irish Cream.
- Crunchy pistachio kataifi center - inspired by the viral Dubai chocolate bar, this tart's pistachio and shredded pastry filling packs plenty of flavor and a fun crisp texture into the middle of every bite.
- Quick ganache topping - sandwiching the thick pistachio center, this showstopping tart is topped off with a thin layer of glossy dark chocolate ganache and a sprinkling of pistachios.
Equipment Notes
This recipe doesn't require anything special - just a few standard pieces of typical bakeware. You'll need:
- 9" pie plate - you can also use a tart case if preferred. This recipe has been written for a 9" pan, but you could also make a couple of smaller tartlets with it. You'll need to divide out your layers and your baking times will vary if you adjust the sizes.
- Mixing bowl - a medium sized mixing bowl will be needed for your pastry dough, but the rest of your layers will be made in pans.
- Plastic wrap - for wrapping your dough to chill.
- Rolling pin - for rolling out your dough.
- Baking beans - if you're using the chocolate pie crust, you'll need to blind bake this. In order to do so, you'll want baking beans, pasta or rice to weigh down the pastry and keep it from rising.
- Parchment paper - as part of blind baking, you'll need to line the crust with parchment before tipping in beans.
- Medium saucepan - for your bottom chocolate tart filling.
- Frying pan or sauté pan - you'll want a large frying pan to toast the kataifi pastry pieces. This is essential for a crunchy texture to the pistachio layer.
- Small saucepan - a small saucepan for heating the cream in your ganache layer.
- Small heatproof bowl - a cereal bowl or other small cup will work fine here. This is for melting your chocolate chips into the ganache.
- Spatula - you can make this entire recipe using one rubber or silicone spatula, rinsing between layers.
Ingredient Notes for the Crust
The crust for this tart is my Chocolate Shortcrust. To make this, you'll need:
- All-purpose flour - or plain flour.
- Cocoa powder - use a good quality Dutch processed for best flavor.
- Brown sugar - a little light brown sugar or muscovado, firmly packed.
- Salt - a touch of salt goes a long way in bringing out flavors and enhancing your dough.
- Butter - unsalted butter, chilled and cut into small pieces. I usually slice slivers of butter straight into my dry ingredients when making my doughs.
- Cold water and instant coffee - coffee acts to enhance the depth and richness of chocolate. You'll need to ensure that your coffee is well chilled before adding to your dough. If you'd prefer, you can substitute with cold water here.
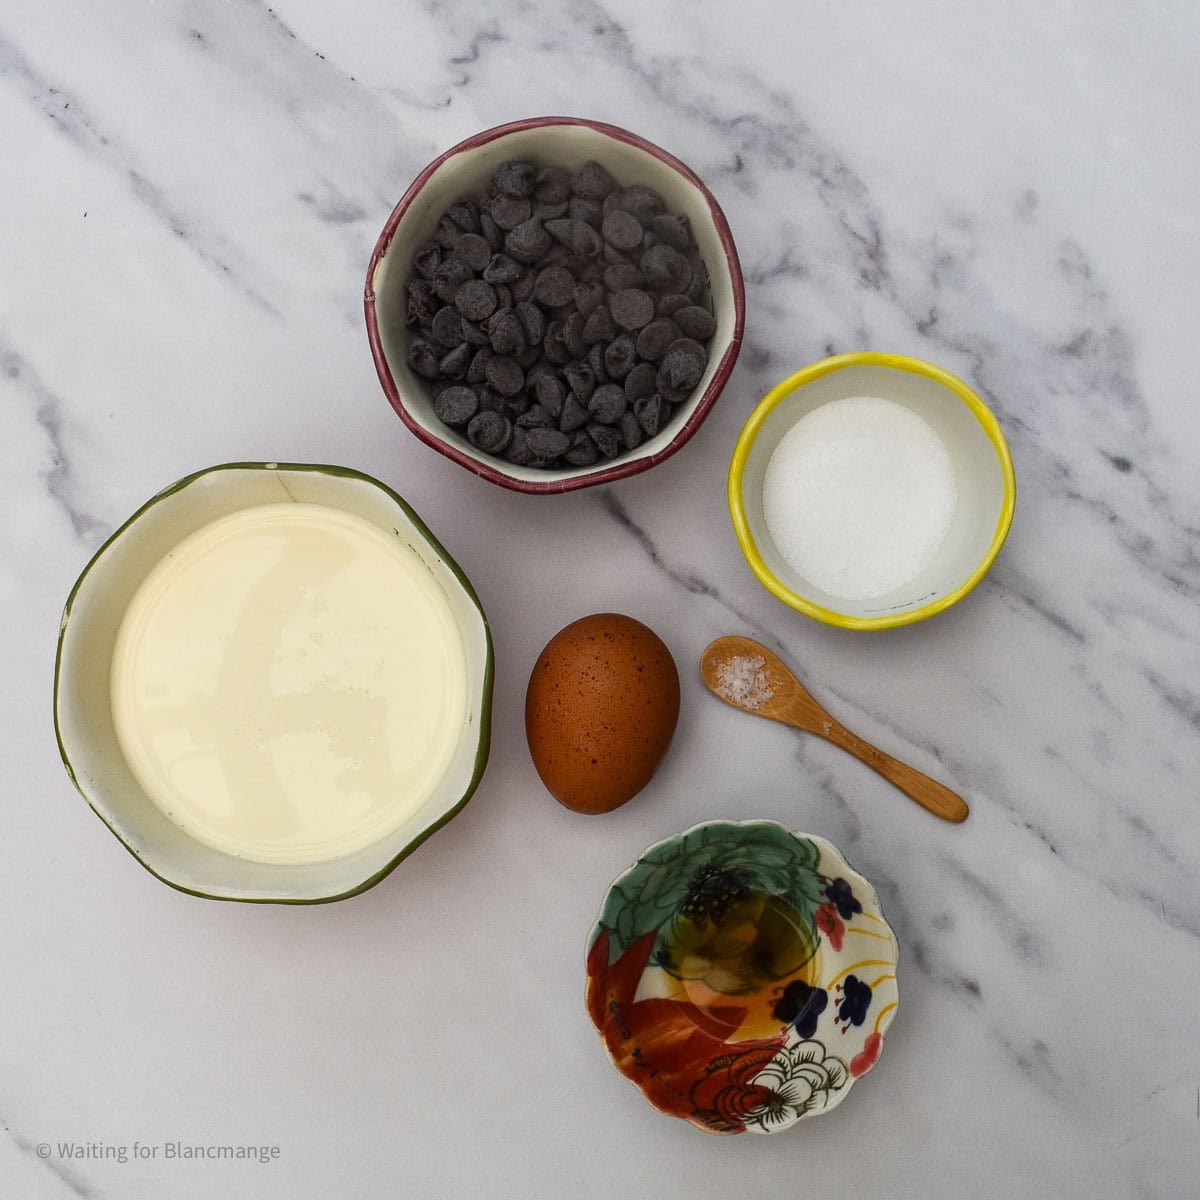
Ingredient Notes for the Fudgy Chocolate Layer
For the chocolate base layer, you'll need:
- Heavy cream - sometimes called double cream or whipping cream depending on where you're based. You're looking for the cream you would use to make homemade whipped cream.
- Vanilla extract
- Dark chocolate chips - a good quality dark chocolate chip or solid chocolate chopped into small pieces to ensure it's easily melted.
- Sugar - granulated sugar or caster sugar will work well in this recipe.
- Salt - a generous pinch of salt will help enhance this layer.
- Egg - a large egg, ideally at room temperature.
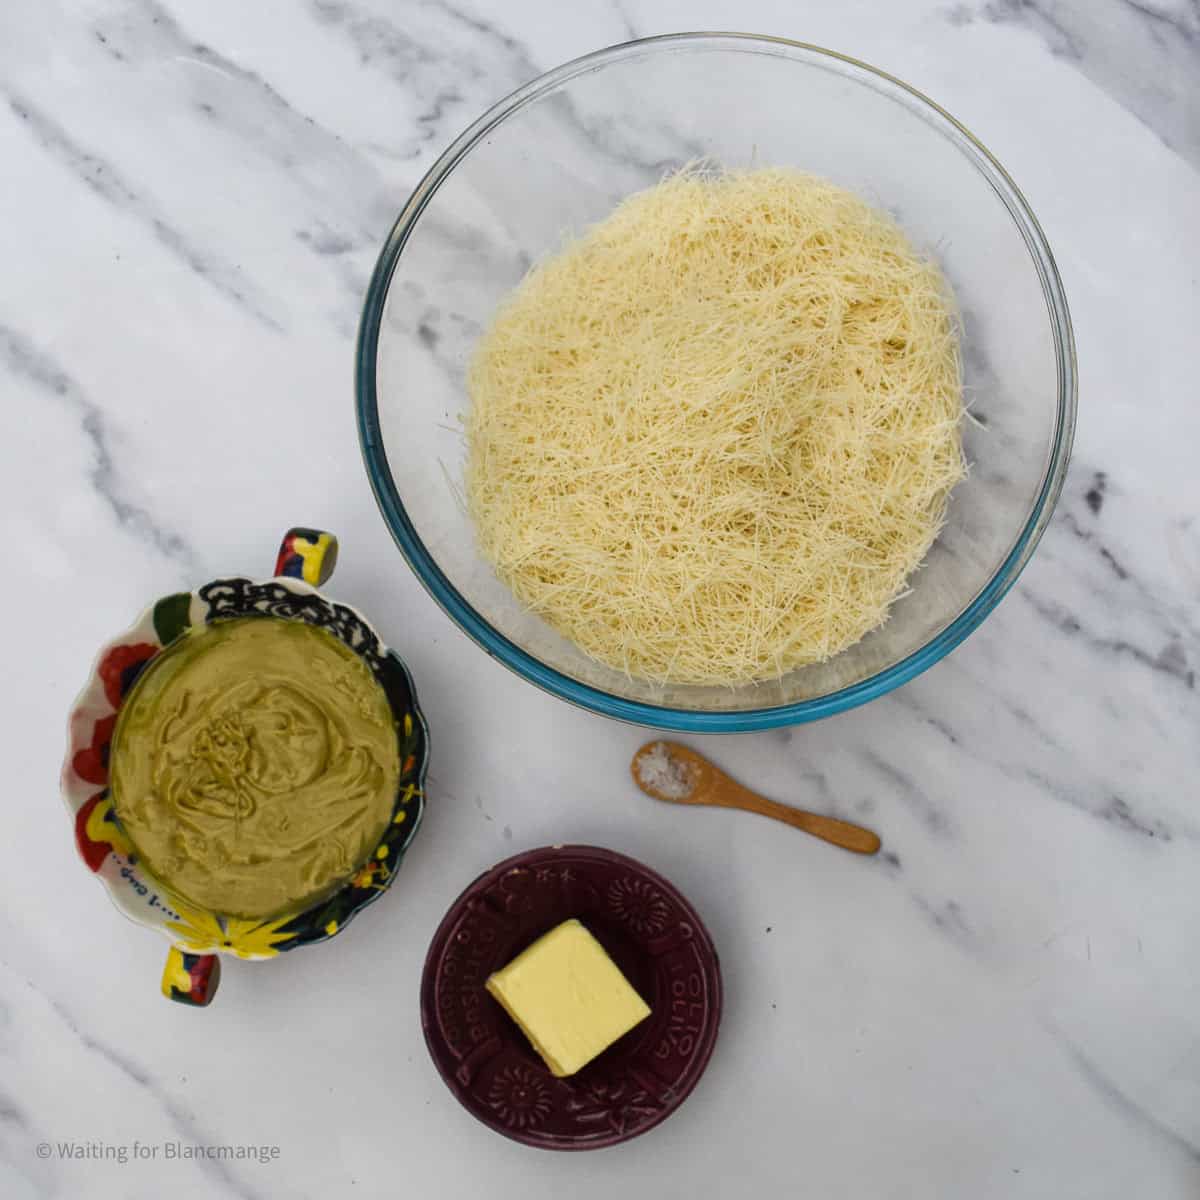
Ingredient Notes for the Pistachio Kataifi Filling
The centerpiece of any Dubai Chocolate recipe - the pistachio filling! For a proper Dubai Chocolate experience, you'll need a few ingredients:
- Pistachio paste - or pistachio cream. You can make your own using just pistachio nuts a bit of honey. See my recipe for an Easy Homemade Pistachio Paste for a step by step guide. Alternatively, pistachio creams have become easier to find in shops. You'll want a good smooth and creamy pistachio paste to give the right consistency to the filling. If your paste is too stiff or thick (especially if you've made your own and not blended long enough) - you'll have difficulty mixing with the toasted pastry and spreading in your pie.
- Butter - unsalted butter is best in this recipe. You can use salted, but you may then wish to omit the additional salt in this filling.
- Salt - a generous pinch to enhance the flavor of the nut butter.
- Kataifi pastry - this is a finely shredded thin pastry, a bit like a mix between vermicelli and phyllo. Typically you can buy this in large packs of dried dough. You'll be toasting this for maximum crispness and a satisfyingly crunchy almost nutty flavor.
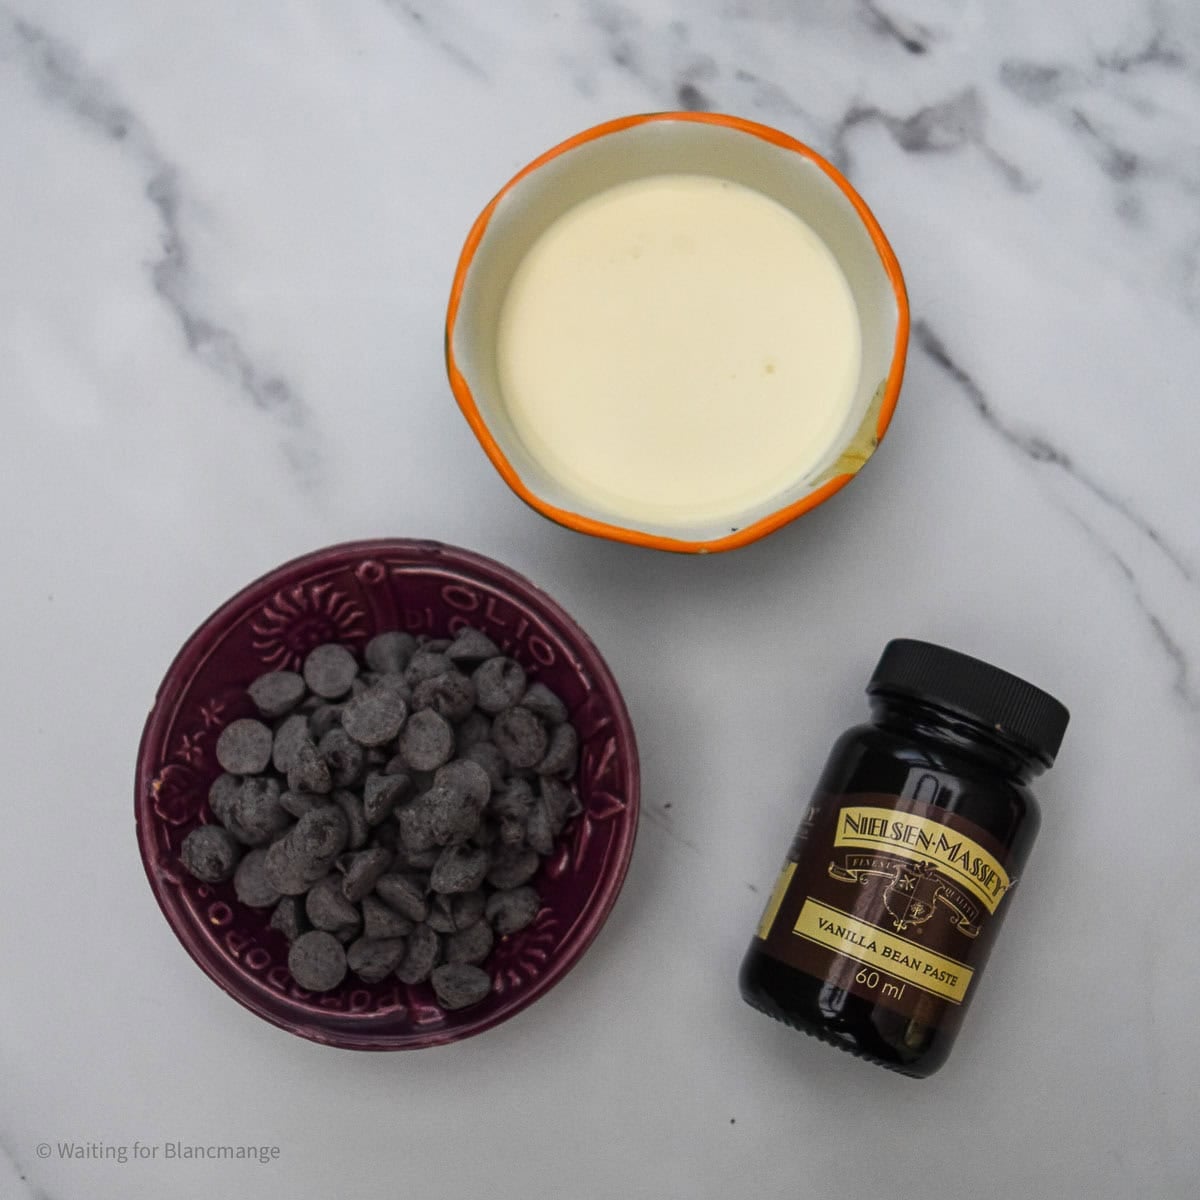
Ingredient Notes for the Ganache Topping
To finish off your Pistachio Chocolate Tart, you'll need just three quick ingredients:
- Heavy cream - more of the same cream you used in your base layer. Sometimes called whipping cream or double cream.
- Dark chocolate chips - or solid chocolate finely chopped. The smaller the pieces, the easier to melt smooth into the ganache.
- Vanilla bean paste - you can also use vanilla extract or leave this out.
- Pistachios - unsalted, roasted pistachios, shelled and roughly chopped.
How to Make Dubai Chocolate Tart - Part 1 (Crust and Chocolate Layer)
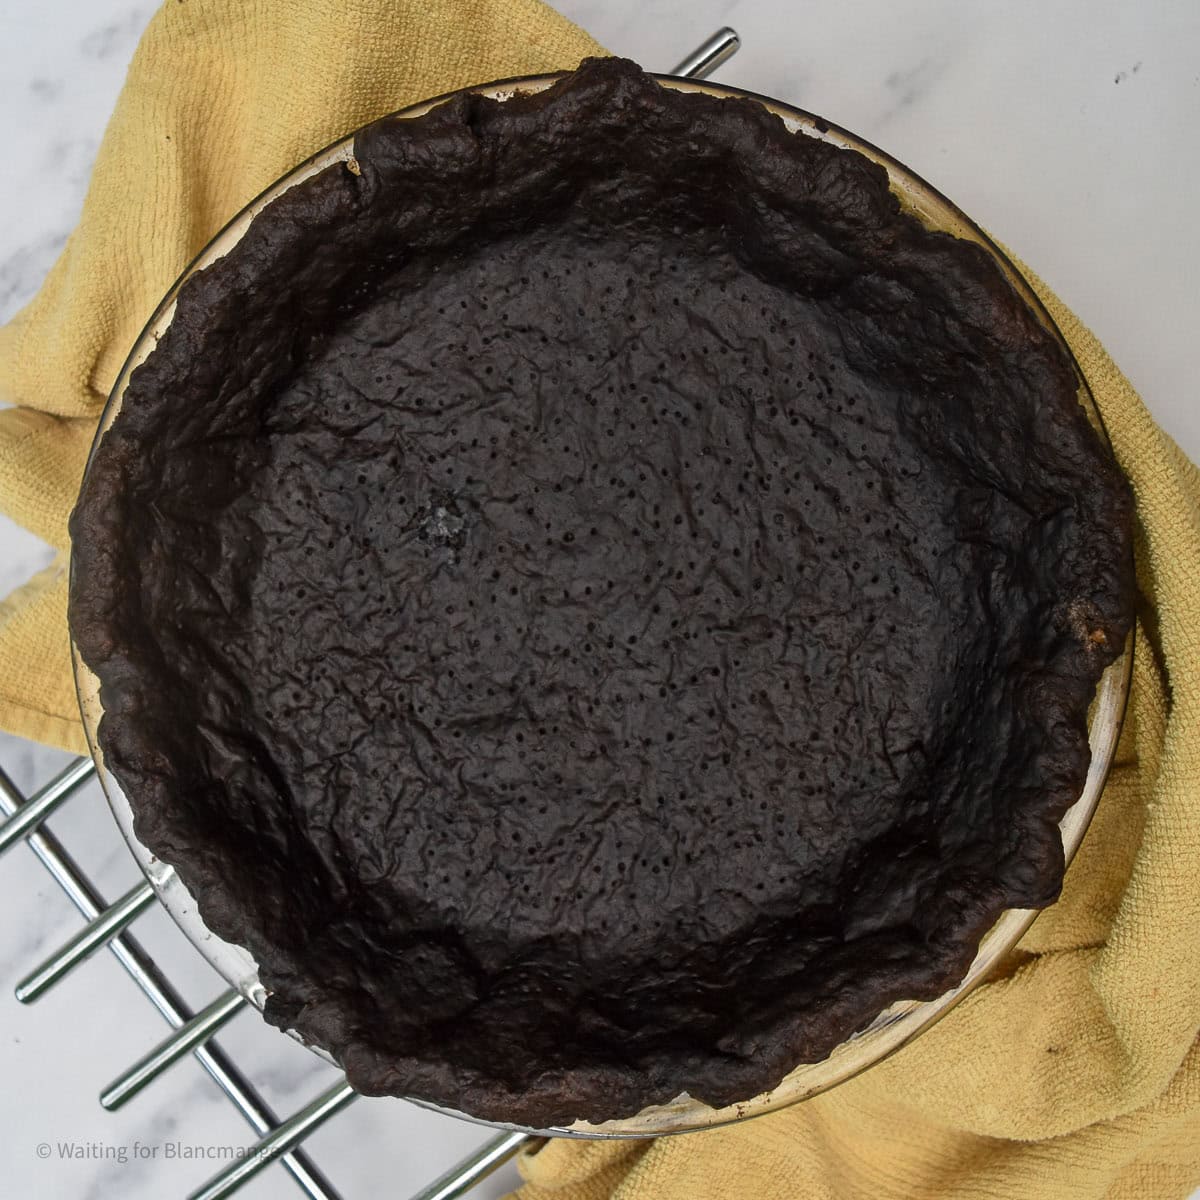
As with any tart or pie recipe, this one starts with the crust. You can find detailed steps in my standalone recipe for Chocolate Shortcrust Pastry. Once your dough has chilled, you will need to roll it out, line your pie plate and blind bake it at 350°F.
Top tip for blind baking: scrunch up your parchment paper into a ball and then unfold. The creased up paper will be easier to handle and get into the corners of your crust. Top off with baking beans or rice to weigh it down when baking.
Once your crust has finished blind baking, reduce the oven temperature from 350°F to 325°F and next make the chocolate base layer.
Step 1: Heat the cream and vanilla in a saucepan over a medium low heat, gently for about 10 minutes. You want this simmering, but not boiling.
Step 2: Remove from the heat and add the chocolate chips, sugar and salt, stirring until the chocolate is melted and smooth.

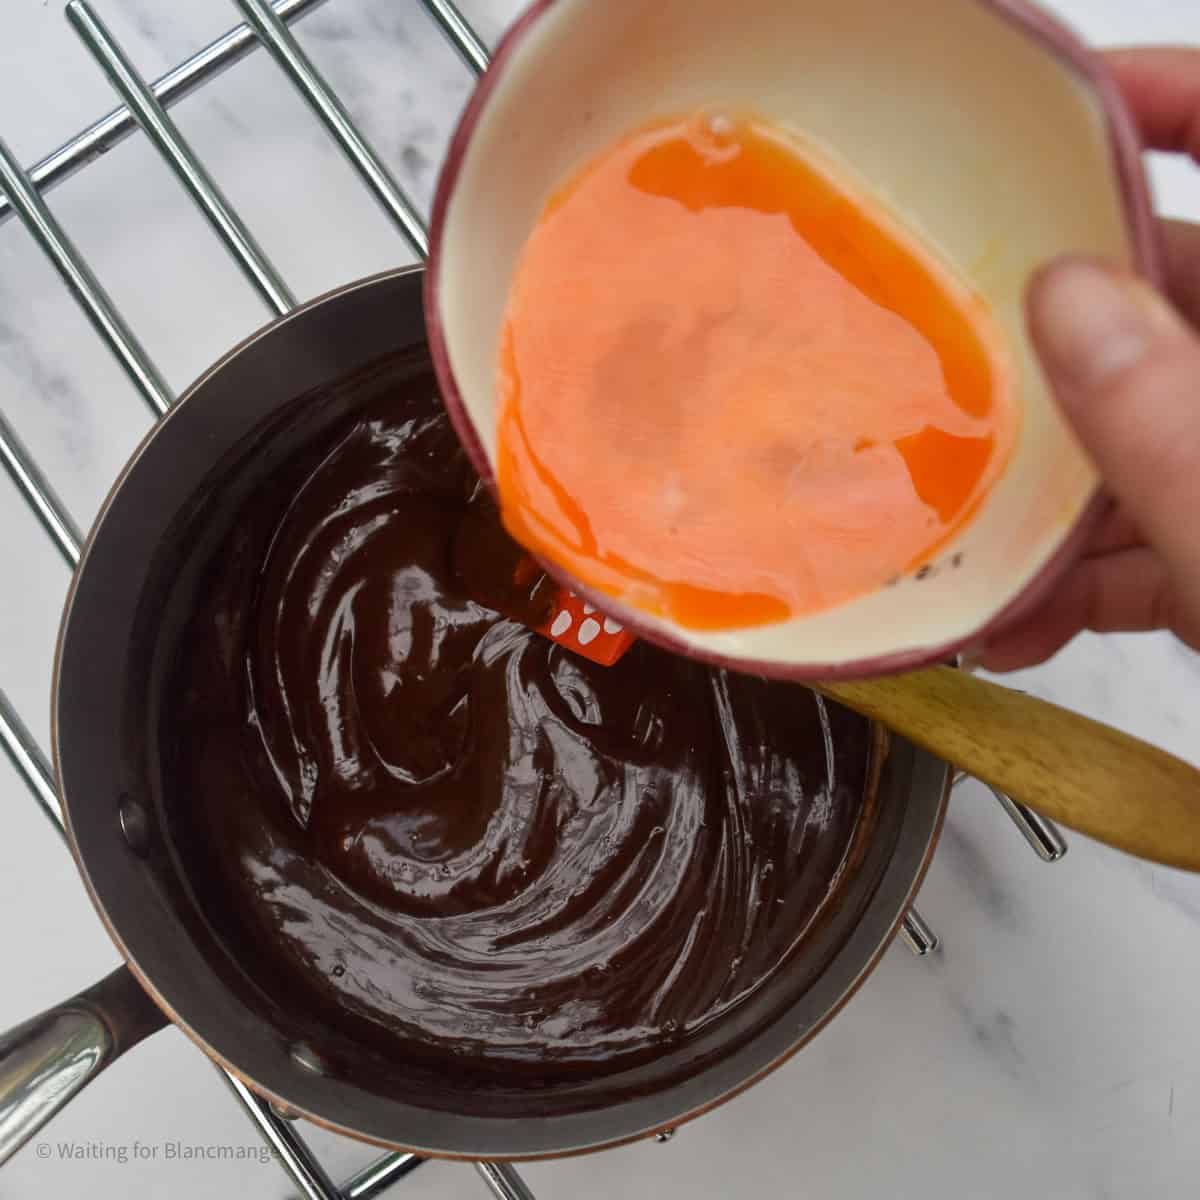
Step 3: Lightly beat the egg and then add this to the chocolate mixture while mixing. Stir until smooth and combined.
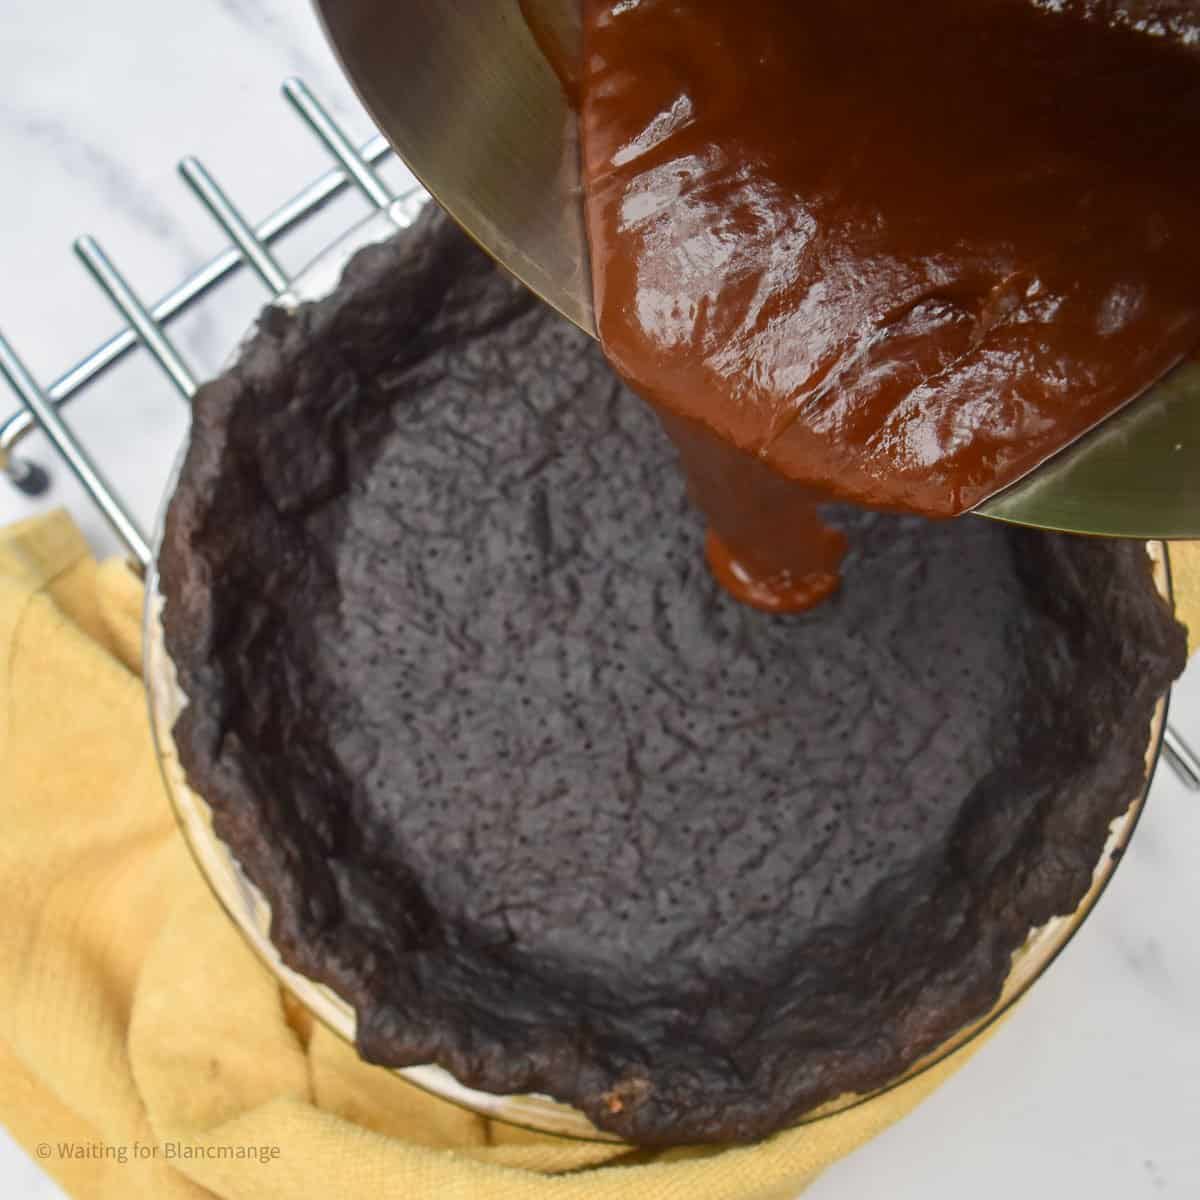
Step 4: Pour your mixture into the pie crust and return to the oven for about 12 minutes until baked and set.
Step 5: Remove from the oven and allow to cool while you make the pistachio layer.
How to Make Dubai Chocolate Tart - Part 2 (Pistachio Kataifi Filling and Topping)
Dubai chocolate is characterized by the crunchy pistachio filling, using toasted kataifi pastry. The process here is super simple, but can take a little time due to the toasting process - you don't want to burn the pastry, so toast over a medium heat rather than high.
Step 1 - Place a large frying pan over a medium heat and add the butter. Let the butter melt before adding the kataifi.
Step 2 - Once the pastry is added, stir occasionally to coat in the butter and toast to golden. This can take 15-20 minutes or so, depending on factors such as the heat distribution in your frying pan or the heat settings on your stovetop. Tip: spread the pastry across the pan, so that as much is touching the surface as possible. Don't stir constantly - your goal is to toast, but not burn the thin pastry pieces. You'll be looking for a deep golden brown, accompanied by a nutty aroma.
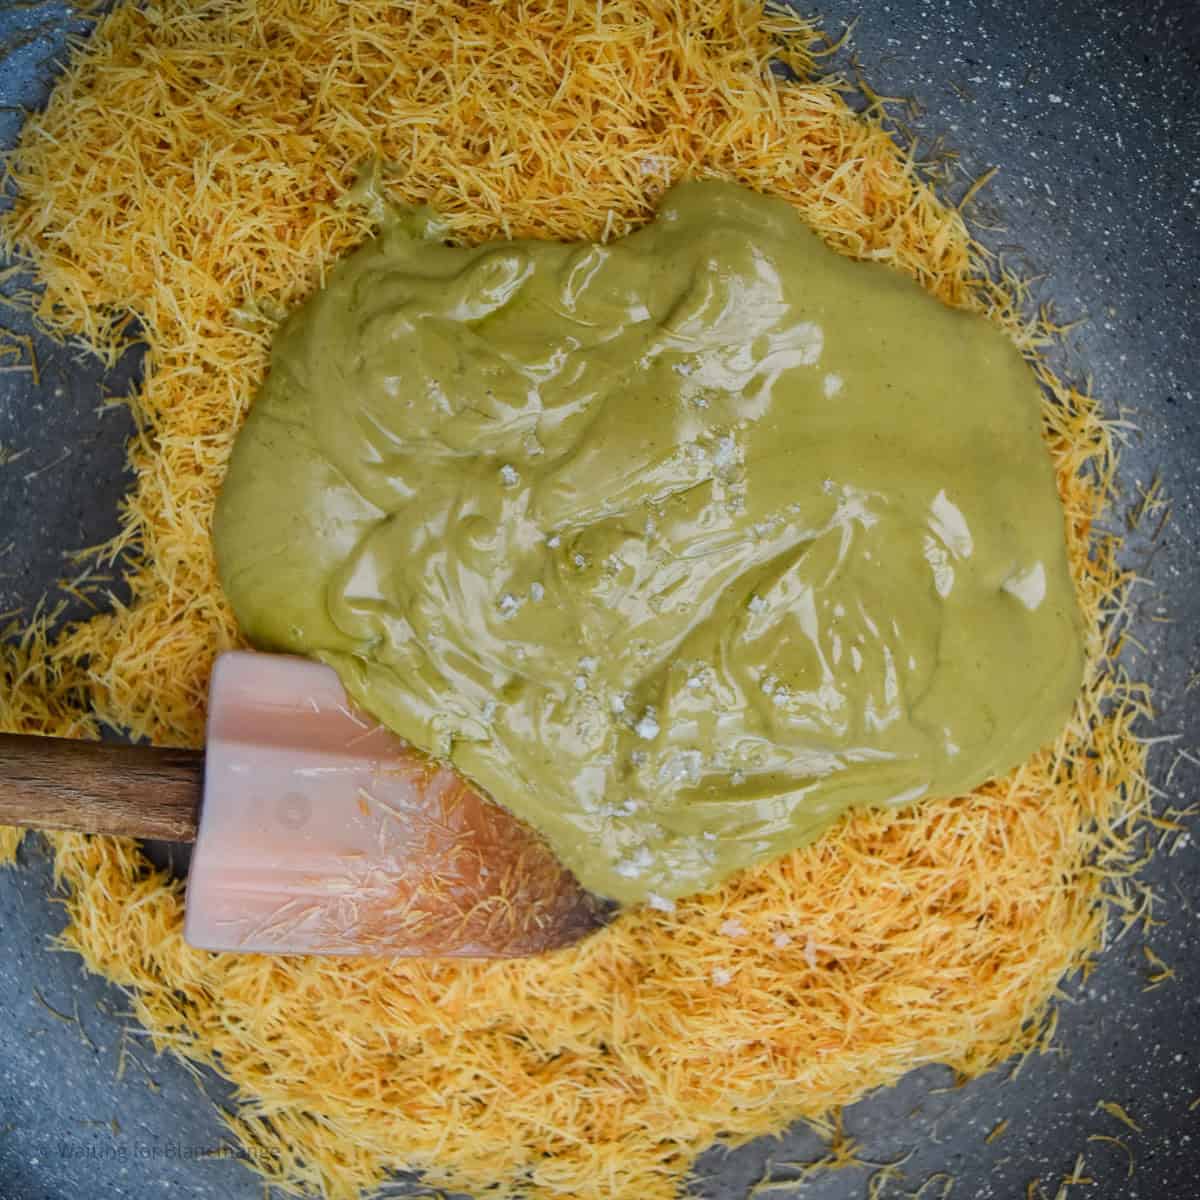
Step 3 - When happy with the toasting, remove from the heat and add the pistachio paste. Stir to combine.
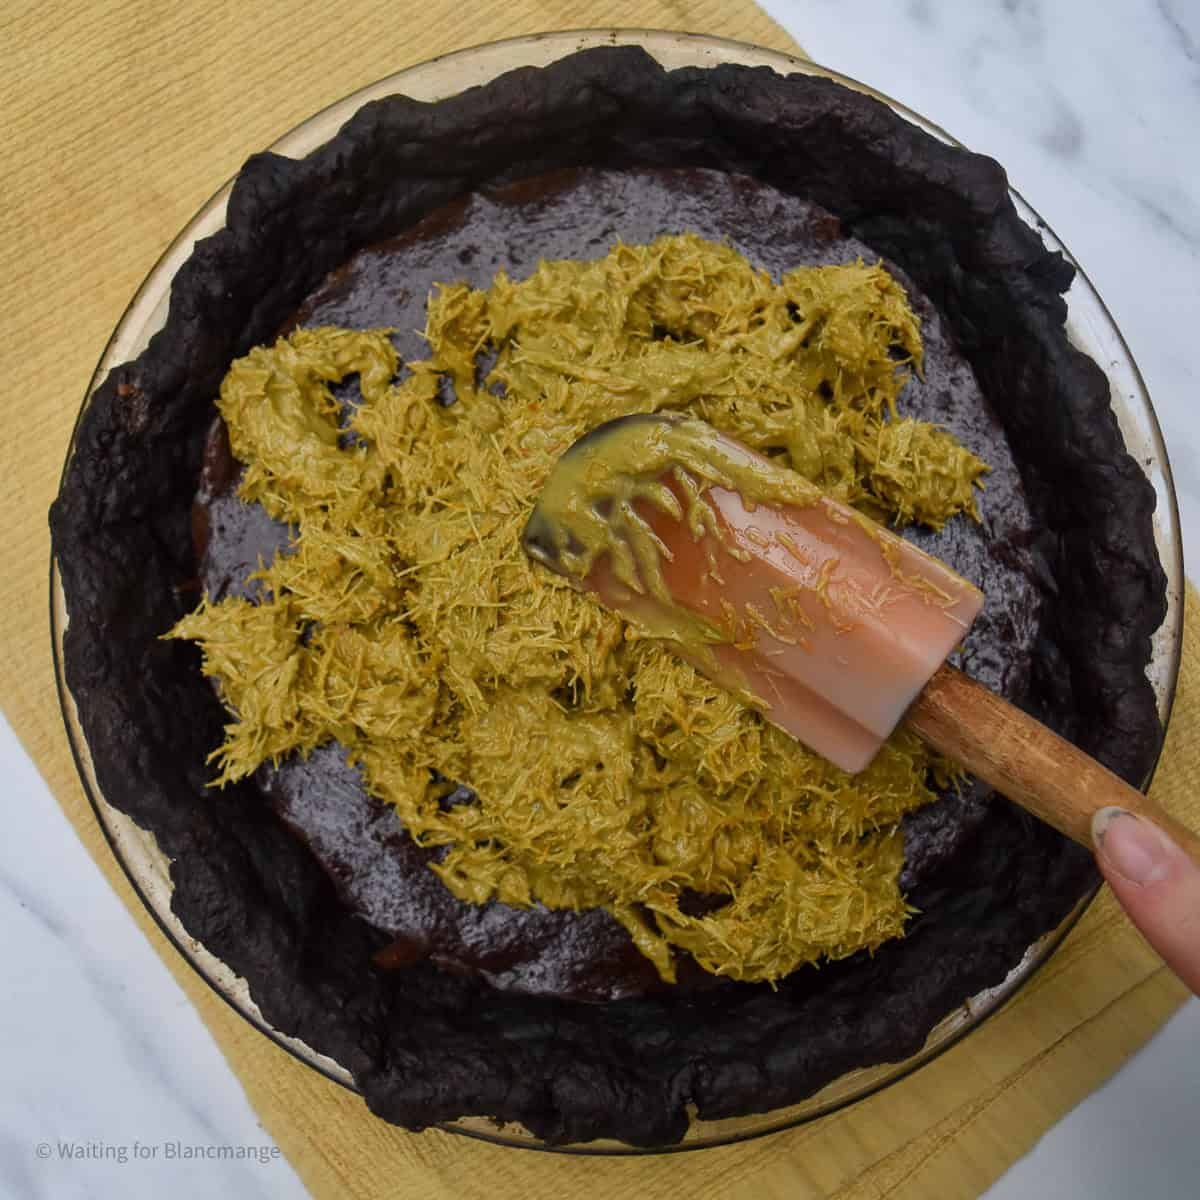
Step 4 - Spread this over your chocolate base on your tart and set aside.
Step 5 - In a small saucepan, heat your cream for about 5-10 minutes, until well warmed through and simmering (but not boiling). Pour this directly over a heatproof bowl holding your chocolate chips and let sit for 2 minutes. Then stir until smooth.
Step 6 - Spread your ganache gently into a thin layer over your kataifi pistachio filling. This may take some gentle nudging as it's intended to be quite a thin layer, but don't worry too much about the smoothness here as you'll be covering with chopped pistachios for decoration.
Step 7 - Sprinkle across roughly chopped pistachios to finish. The tart is ready to serve or chill until needed. When going to serve, allow it to sit out of the fridge for about half an hour to make it easier to cut through the layers - the ganache in particular will be fairly stiff straight from the fridge!
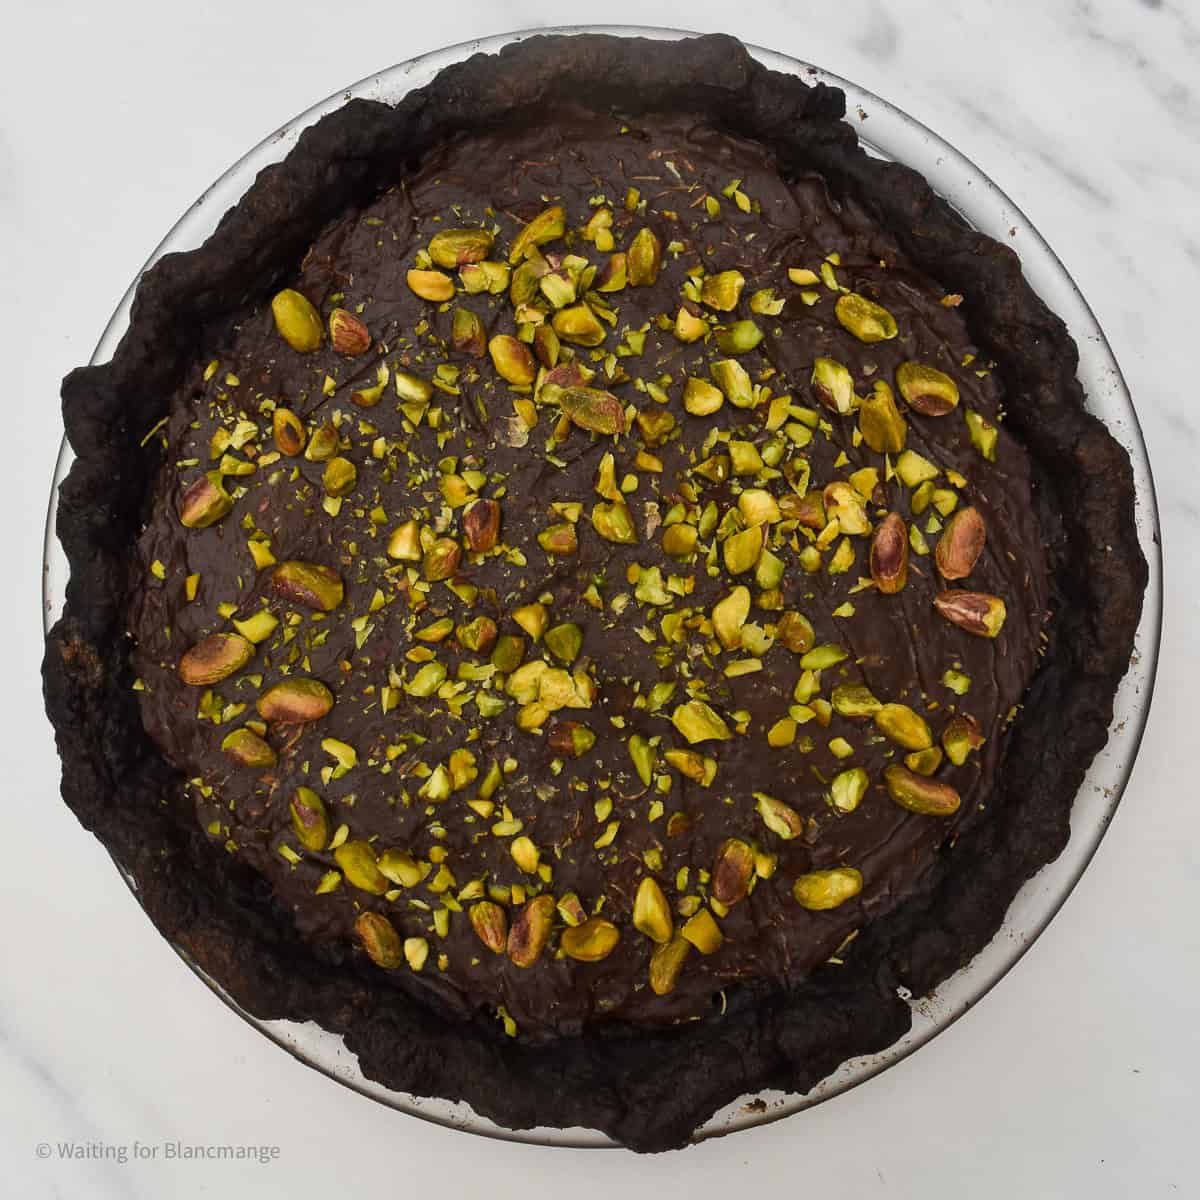
Expert Tips
Don't let the layers of this recipe full you into thinking it's difficult or complex. Truly this is one of the most forgiving tarts you'll make! My top advice here:
- Try to avoid overworking your dough. An overworked dough will lead to a stiffer crust that goes from being flakey to being firm and more difficult to slice.
- When adding the eggs to your chocolate base layer, it is best practice to whisk or lightly beat them first. This is to avoid scrambling them as you add to a still relatively warm pan. That said, if you are whisking your mixture continuously you can add them straight in without issue.
- For the kataifi toasting, you can separate this into batches (halving the butter and pastry for each). This might make the toasting go more quickly, since you'll be creating more surface area for the pastry to be against the pan and therefore browning. There isn't really any way around this process taking a little time, but the nutty aromas are delightful and you'll not regret the crunch!
- This recipe uses a very small batch of ganache. I dolloped this out in small patches on my tart and then used the back of a spoon to gently nudge to the edges, covering in a thin layer. Don't worry if it doesn't fully cover the tart or isn't perfectly smooth. The pistachios on top cover all manner of mishap and make this a glamorous centerpiece no matter what!
Storage Advice
The ganache topping here means that this tart should really be stored in the fridge. It will keep for several days and I've certainly eaten leftovers about a week after making it (if it lasts that long!).
For ease in cutting, I'd recommend allowing the tart to sit out of the fridge for about half an hour before slicing/serving.
I've not tested freezing this recipe - results may vary as the layers could separate a bit on defrosting. You may also find that freezing impacts the crunch of the kataifi and/or the pistachios sprinkled on top.
Substitutes and Alternatives
Some quick and easy substitutes for this recipe include:
- Try an Oreo crust for the base instead of the Chocolate Pastry Shell. You won't need to blind bake the Oreo, before your filling and layering can begin.
- Don't have kataifi? Don't worry - you can try this recipe with other add-ins such as shredded wheat cereal or crushed cornflakes. These may impact the flavor a bit, but they should still provide a crunch.
- Pistachio paste substitutes - let's be honest, if you've come to this recipe you're probably after a pistachio chocolate tart of some variety. This does mean that you'll really need to source pistachio paste of some kind. This has become much more widely available, and really any pistachio paste or pistachio cream will work here. You can even make your own with unsalted shelled pistachios - you'll just need patience and a strong food processor.
FAQs
Dubai Chocolate has been a bit of an internet sensation. Unlike a lot of viral recipes, the flavor combination of pistachio and chocolate along with the now characteristic crunch of the 'Dubai Chocolate' from the kataifi pastry make this combination truly live up to (and exceed) expectations! This tart is inspired by the viral chocolate bar, with layers of chocolate filling and ganache sandwiching crunchy pistachio kataifi filling.
Yes, this Chocolate Pistachio Tart is perfect as a make ahead dessert - bake it up the day before your event, store in the fridge and serve to a chorus of compliments!
More Pistachio Recipes
If you are as obsessed with pistachio as I am - then you might want to try some of my other top pistachio recipes:
- Homemade Pistachio Paste
- Easy Oatmeal Pistachio Chocolate Chip Cookies
- Pistachio No Bake Cheesecake with White Chocolate Pistachio Ganache
- Coconut and Pistachio Cinnamon Rolls
- Creamy Pistachio Panna Cotta
Dubai Chocolate Pistachio Tart
Ingredients
Ingredients for Crust
- 1¼ cup all-purpose flour
- 2 tablespoon cocoa powder Dutch processed
- 2 tablespoon light brown sugar or muscovado, firmly packed measurements
- pinch salt
- ½ cup unsalted butter cold, unsalted butter, cut into small cubes
- 1 tablespoon instant coffee see note
- ½ cup water this needs to be cold - either well chilled or with some ice (see note)
Ingredients for Chocolate Base Layer
- ¾ cup heavy cream sometimes called double cream or whipping cream
- 1 teaspoon vanilla extract
- 4 oz dark chocolate chips or solid chocolate chopped finely - you can also use semi-sweet or milk chocolate here, but I find dark chocolate (approximately 72% cocoa solids) my favorite combination
- 1 tablespoon superfine granulated sugar or caster sugar
- ¼ teaspoon salt
- 1 large egg ideally at room temperature, lightly beaten
Ingredients for Pistachio Kataifi Layer
- 3 cups dried kataifi pastry measurements don't need to be precise - I used generous cup measures
- 3 tablespoon unsalted butter
- ¼ teaspoon salt
- 1 cup pistachio paste you want a smooth and creamy pistachio paste for this recipe - you can make your own using my Homemade Pistachio Paste recipe
Ingredients for Ganache Topping
- ¼ cup heavy cream also known as double cream or whipping cream
- 2 oz dark chocolate chips or solid chocolate finely chopped
- 1 teaspoon vanilla bean paste or vanilla extract
- handful chopped pistachios unsalted, shelled and roughly chopped
Instructions
Instructions for the Crust
- Start by mixing together your instant coffee with your cool water. Stir until dissolved and then place in the refrigerator to chill thoroughly while you prep your dough.1 tablespoon instant coffee, ½ cup water
- Next mix together your dry ingredients - the flour, cocoa powder, brown sugar and salt. Cut in your cold butter. Using your hands rub this into the dry ingredients until you have a coarse sandy texture - your goal isn't to break down all of your butter - bits of butter contribute to the flakey texture.1¼ cup all-purpose flour, 2 tablespoon cocoa powder, 2 tablespoon light brown sugar, pinch salt, ½ cup unsalted butter
- Slowly add your cool coffee into the dough mixture, starting with ¼ cup. Gently mix with your hands until it comes together into a dough. Avoid overadding water and overworking the dough as this can make for a stiffer, less flakey crust. You may find that you do not need all of the coffee or need to add a little more cold water depending on various conditions (like humidity or temperature in your kitchen).
- Once you've brought your dough together into a ball, wrap this with plastic wrap and gently flatten into a disc. Place this in the refrigerator to chill for at least 2 hours.
- After 2 hours, pre-heat your oven to 350℉ (175C/155C Fan). Unwrap your dough and place on a work surface, lightly dusted with cocoa powder. The cocoa powder will act like flour for rolling out the chocolate crust. Roll out to a circle approximately ¼" thick. Use this to line your pie plate and then use a fork to prick your dough all over the bottom and sides.
- Use a scrunched up piece of parchment paper to line the inside of the crust and fill with baking beans or rice to blind bake. Place in the center of your preheated oven to bake for about 30 minutes. Then remove your weighted parchment filling and bake for a further 5-10 minutes until the crust appears dry.
- Remove from the oven and set aside while you prepare the filling.
Instructions for the Chocolate Base
- Reduce your oven temperature to 325℉ (165C/145C Fan).
- In a medium saucepan, heat the cream and vanilla gently over a medium heat until simmering (about 10 minutes).¾ cup heavy cream, 1 teaspoon vanilla extract
- Remove from the heat and add the dark chocolate, sugar and salt. Stir until combined and smooth.4 oz dark chocolate chips, 1 tablespoon superfine granulated sugar, ¼ teaspoon salt
- Lightly beat the egg in a small bowl before adding this to the chocolate mixture and whisking to combine.1 large egg
- Pour the mixture into your prepared tart shell, spreading smoothly. Place this in the oven and bake for about 12 minutes until set. Remove from the oven and set aside while you prepare the toppings.
Instructions for Pistachio Kataifi Filling
- In a large frying pan, melt the butter over a medium heat and then add the kataifi pastry. Stir occasionally to toast the kataifi until golden and nutty in aroma. This takes about 15-20 minutes slowly toasting - times will vary depending on the heat settings of your stovetop and your pan.3 tablespoon unsalted butter, 3 cups dried kataifi pastry
- Once toasted, remove from the heat and add the pistachio paste and salt, mixing to combine.1 cup pistachio paste, ¼ teaspoon salt
- Spoon the filling over the chocolate base layer of your tart. Carefully spread evenly and set aside while you make the ganache.
Instructions for Ganache and Topping
- In a small saucepan, heat your cream and vanilla paste over medium heat until simmering (about 10 minutes), then pour this over your chocolate chips in a heat proof bowl. Let this sit for about 2 minutes before stirring smooth.¼ cup heavy cream, 2 oz dark chocolate chips, 1 teaspoon vanilla bean paste
- Pour this onto your pistachio filling and use a spoon or spatula to gently nudge over the filling in a thin ganache layer.
- Finish off by sprinkling with chopped pistachios.handful chopped pistachios
Notes
- If you don't wish to use coffee in your crust, you can simply leave this out. The coffee acts to accentuate the flavor of the chocolate, but it isn't fundamental to the crust turning out! Just use plain cold water here - no need to mix in instant coffee and chill.
- The amount of water you need will be determined by many conditions - such as the temperature in your kitchen, humidity and broader weather conditions on the day, different brands of ingredients, elevation, etc. Add about a quarter cup and then mix. Add additional water slowly kneading gently with your hands to come together in a dough. You want to avoid overworking the dough, but also over-adding the water. You may find you don't need all the water called for here, but equally you may find you need a touch more to bring it all together.


Leave a Reply